
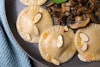
Vegan Butternut Squash Ravioli with Sage Butter and Mushrooms
February 15, 2021

As a regular vegan home chef without any special training, the idea of making my own ravioli was a little intimidating not too long ago. But since I've managed to create beautiful, delicious ravioli at home, I know that you can too! And when you taste the results, I'm sure you'll agree that this vegan butternut squash ravioli recipe is worth all the work.
For the butternut squash filling, I really wanted to let the flavor of the squash shine, so I didn't add any tofu or vegan cheese. Instead, I added garlic, almonds, lemon juice, and seasonings to enhance the creamy sweetness of the squash. I also used a basic sage-butter sauce with mushrooms to complement the ravioli filling without overpowering it.
While the creamy filling and the sage sauce are pretty simple to make, the homemade ravioli dough and assembly are a little more complicated. So I'm going to add some more detail here in the post that won't quite fit in the recipe itself, including some alternate methods that you might want to use. If you are already comfortable with your own methods for rolling out the dough and assembling the ravioli, you can use the "skip to recipe" button above to go straight to the recipe. However, if this is your first time making ravioli, I encourage you to read through the post before attempting the recipe.
How to Make Vegan Ravioli Dough
Making the dough itself is fairly simple, especially if you have a stand mixer. If you don't, it's not a problem, but you'll have to knead the dough by hand for a while until it becomes smooth.
If you have a stand mixer, use the paddle attachment to mix the dry ingredients (00 flour and salt), then add in the water and olive oil. Mix the dough on speed 2 or 3 for a minute or two, until the dough comes together in a rough ball. Then switch to the dough hook and knead on speed 3 or 4 until the dough is smooth, about 5 minutes.
If you don't have a stand mixer, start by mixing your 00 flour and salt in a medium mixing bowl. Make a well in the center of the flour and salt mixture, then pour the water and olive oil into the well. Mix until the dough comes together, then knead by hand until the dough is smooth, around 10-15 minutes.
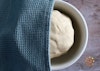
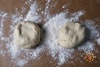
Once your dough is formed, shape it into a ball and place it in a bowl to rest with a damp kitchen towel over the bowl. You can also wrap it in plastic wrap (the goal is to keep it from drying out), but I personally prefer to use a kitchen towel because it creates less waste. You'll want to let the dough rest for at least 30 minutes before rolling it out. You can also put it in the refrigerator if you won't use it right away, but you should wrap it in plastic wrap instead of a kitchen towel. It should last several days there until you're ready to use it.
Rolling Ravioli Dough
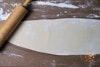
Depending on how much space you have for rolling, you may wish to cut the dough into 2 or 4 pieces before rolling. You'll need a longer length of space (3 to 4 feet) for 2 large pieces than for 4 smaller pieces. Either way, you should roll your dough in a long strip that's about 5 to 7 inches wide. If you're cutting the ravioli using a stamp, knife, or cookie cutter, do your best to ensure you have pairs of dough that match closely in size and shape, since one strip will be going on top of the other. If you're using a ravioli mold, make sure that each strip is long enough and wide enough to cover the entire mold, if you're using 4 strips (for 2 strips, each strip should be able to cover the mold when folded in half).
Rolling out the dough may be the most difficult part, since it takes quite a lot of time and muscle to get as thin as it should be for ravioli. (Feel free to use a pasta maker instead to make it easier!) The dough likes to bounce back to its original thickness once the rolling pin has passed over it. I've found it helpful to hold one end of the dough while I use the rolling pin to push the rest of the dough in the opposite direction. Then I hold it in place on both ends for a few seconds before I let it go.
When you're finished, the dough should be around 2-3 mm thick or 1/16" to 1/8" (which is thinner than you think when you're rolling the dough). When you hold it up to the light, you should be able to see light through the dough, and you should be able to see an equal amount of light on all parts of the dough (dark spots will show you where the dough has not been rolled evenly). The dough should feel delicate when you lift it, and you should need to support it with both hands to keep it from breaking or stretching too much.
Assembling and Cutting Vegan Ravioli
There are two methods you can use to assemble the ravioli, depending on the tools you have available. I initially used this ravioli mold, but I decided that I preferred cutting the ravioli using a small drinking glass. The ravioli mold required a lot of flour to get the ravioli to release easily, and I also found it harder to get the air bubbles out of the ravioli using the mold. There are also ravioli stamps available which will seal your ravioli for you and give you pretty-shaped edges.
If you're using a glass, a cookie cutter, or a ravioli stamp, choose the smaller of the two sheets (or use either sheet if they're exactly equal) to use as your base. Dust your glass, cookie cutter, or stamp in flour, then press gently (but don't cut) on your dough to mark the space where your ravioli will be cut later.
Using two spoons or a piping bag, place about 1/2 tablespoon of filling at the center of each raviolo. You may need to use more or less filling depending on the size of the ravioli you're cutting. Then brush water around the inside edges of each raviolo.
Take the second sheet and carefully cover the first sheet and the fillings. Work from one end to the other, making sure each ravioli mark is fully covered by the top sheet, and pushing out any air bubbles before pressing the top sheet onto the wet dough of the bottom sheet to seal.

Once your two sheets have been sealed, start cutting your ravioli, centering the filling mounds inside your stamp or cookie cutter. Don't worry if you don't cut exactly over the markings on the first sheet of dough. As long as your filling is approximately centered in the raviolo, it will work! If you're using a cookie cutter or glass, you may wish to use the tines of a fork to seal the edges. Set the finished ravioli on a wire rack to dry for about an hour before cooking. You can re-roll the dough once, but I don't recommend re-rolling more than that, as the dough will become too tough to roll.
If you're using a ravioli mold, start by either spraying the mold with oil, or flouring it. The best way to get enough flour on the mold is to press the surface of the mold into a mound of flour.
If you made 4 sheets of dough, then take one sheet of dough and place it on top of the mold, making sure all the edges are covered. If you made 2 sheets of dough, use one half of a sheet of dough to cover the mold completely, leaving enough dough on the other end to fold on top. Take the plastic shaping mold and press it into the dough to stretch it for the filling.
Fill each well with about 1/2 tbsp. of filling (you can use more or less, depending on the size of your mold). Then brush water on the edges of the ravioli. Place the second sheet (or fold the other half of the sheet) on top of the dough and filling, working from one side to the other and pushing out air bubbles as you go. Roll a rolling pin over the edges of the mold to cut the ravioli (you may need to roll at an angle on the edges to get the ravioli dough to be cut completely). Turn the ravioli mold upside down over a wire rack and gently release the ravioli. Use a knife to separate any ravioli that weren't completely cut by the mold. Let the ravioli dry for an hour before boiling. You can re-roll the dough once, but after that it will probably be too tough to re-roll.
Frequently Asked Questions
Do I have to use 00 flour for ravioli? Type 00 flour is preferred for ravioli because it's lighter doesn't overpower the flavor of the filling. But type 00 flour is not available everywhere, and all-purpose flour will work if you can't get 00 flour.
Do I need a pasta machine/pasta maker for ravioli? A pasta maker will help you achieve pasta sheets with an even thickness, and it requires less muscle from you. But you can also make ravioli sheets with a rolling pin, as I've described in this recipe.
Can I knead ravioli dough by hand? Yes, but you'll likely need to knead it for around 10-15 minutes. It's much easier with a stand mixer!
Can I use frozen butternut squash for the ravioli filling? I don't recommend using frozen squash because it's already cubed and it will dry out too much when it's roasting. Then your filling won't be as smooth and creamy.
How many ravioli will this recipe make? It will depend on the size of the ravioli you're making. I was able to make 26 2-inch-round ravioli. You'll get more ravioli if you're cutting them smaller, or fewer if you're making larger ravioli.
Can I make the ravioli dough ahead of time? Yes! You can refrigerate it for a day or two as long as you wrap it tightly in plastic wrap.
Can these ravioli be used for fried ravioli or toasted ravioli? Yes, you can coat and fry these ravioli instead of boiling them if you prefer.
How long will these ravioli last in the refrigerator or freezer? You can keep these ravioli in an airtight container in the refrigerator for 3-4 days; if you want to store them longer, freeze them in a single layer on a parchment-lined baking tray, then transfer to a freezer bag and store in the freezer for up to 2 months.
Vegan Butternut Squash Ravioli with Sage Butter and Mushrooms
Yield4 servings
Prep Time2 hours
Cook Time1 hour, 5 minutes
Total Time4 hours
Ingredients
Ravioli Dough
- 2 1/4 cup plus 2 tbsp. type 00 flour
- 1 tsp. salt
- 3/4 cup water
- 1 1/2 tbsp. extra-virgin olive oil
Ravioli Filling
- 1/2 of a medium (3-lb/1.36-kg) butternut squash
- 4 cloves garlic, whole, peeled
- olive oil and ground cinnamon for roasting
- 1/4 cup raw, unsalted almonds
- 2 tbsp. nutritional yeast
- 1 tsp. freshly squeezed lemon juice
- 1/2 tsp. salt
- 1/8 tsp. black pepper
- 1/8 tsp. ground cinnamon
- 1/8 tsp. ground nutmeg
- 1/8 tsp. ground sage
Vegan Sage Butter Sauce and Mushrooms
- 10 fresh sage leaves
- 8 oz. baby bella (cremini) mushrooms, sliced
- 1/2 cup low-sodium vegetable broth
- 1 tbsp. freshly squeezed lemon juice
- sliced almonds and fresh sage leaves for garnish (optional)
Instructions
Preheat the oven to 400°F (205°C). Line a baking sheet with foil or parchment paper. Use a sharp knife to slice the top and bottom off of a medium butternut squash, then cut it in half length-wise. Use a spoon to scoop out the seeds. Brush the cut side of one half of the squash with olive oil, and sprinkle a bit of cinnamon on top. Place the squash cut-side-up on the lined baking sheet.
Make a packet from aluminum foil and place the 4 garlic cloves inside. Drizzle with olive oil, close the packet, and place it on the baking sheet with the butternut squash.
Roast the squash and garlic at 400°F (205°C) for 40-50 minutes, until the squash is fork-tender. Remove from the oven and allow the squash to cool about 30 minutes before continuing with the filling.
![Butternut squash and garlic on a baking tray lined with parchment paper, ready to be baked]()
While the squash is roasting, prepare the ravioli dough. In the bowl of a stand mixer using the paddle attachment, or in a medium mixing bowl, mix the flour and salt. Add in the water and olive oil and mix on a low speed (2-3) until combined. After the dough has just come together to form a rough ball, switch to the dough hook if using a stand mixer, and knead on medium-low speed (3-4) for about 5 minutes, until the dough is smooth. Alternately, knead the dough by hand until it’s smooth. Then, shape the dough into a ball and place it in a bowl and cover with a damp kitchen towel. Set aside to rest while you finish the filling.
![On the left, an image of the ravioli dough in a stand mixer with paddle attachment before kneading; on the right is the dough after being kneaded with the dough hook]() Left: Ravioli dough in a rough ball before kneading; Right: Ravioli dough after kneading with dough hook
Left: Ravioli dough in a rough ball before kneading; Right: Ravioli dough after kneading with dough hookAfter the squash has cooled, add almonds to a blender and pulse until the almonds have been cut into small pieces. Use a spoon to scrape the butternut squash from the skin and measure 1 cup of squash. Add the 1 cup of squash, garlic, nutritional yeast, 1 tsp. lemon juice, salt, black pepper, cinnamon, nutmeg, and ground sage to the blender and blend until smooth. You may need to stop your blender occasionally to scrape down the sides. Transfer to a bowl and set aside.
![Ground almonds in a blender]() Blend your almonds until they have been reduced to small pieces.
Blend your almonds until they have been reduced to small pieces.Prepare a large, lightly floured work surface where you can roll out your pasta dough. Divide the dough into two equal balls (or four balls if you have a small workspace), then roll each one out until it’s 2-3 mm thick. When you hold it up to the light, you should be able to see light through the dough. Both sheets should be approximately the same size and shape. You can also use a pasta maker to roll out your sheets of dough.
![A wide view of the ravioli dough rolled on a floured surface with a rolling pin to the side]()
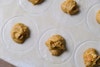
Dip the edges a round or square ravioli stamp, cookie cutter, or glass (I recommend 1 1/2 to 2” diameter) in flour, then lightly press on one of the ravioli sheets to mark the outline of each raviolo (if the sheets aren’t exactly equal in size, use the smaller sheet for this step). Then place about 1/2 tablespoon of filling on the center of each circle using a pair of spoons. (You could also pipe the filling using a piping bag, if desired.)
![Rolled ravioli dough with marked circles and dollops of vegan butternut squash ravioli filling]()
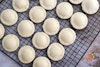
Brush water along the inside of each circle on the dough to help seal the sheets together. Then, take the second sheet and carefully place it on top of the first sheet, working from one end to the other and pushing out air from the ravioli before pressing down on the top sheet to seal them. Use your stamp, glass, or cookie cutter to cut the ravioli, then crimp the edges using a fork, if desired. Set aside on a wire rack to dry for about an hour before boiling. You can re-roll the dough again to make more ravioli, but I’d only recommend re-rolling once, as the dough will get too tough. You can add a splash of water to soften the dough, if needed.
![A raviolo that has been cut and pressed with fork times next to the dough strip, rolling pin, and bowl of filling]()
Bring water to a boil in a medium saucepan, then add 4-5 ravioli at a time and cook for about 3 minutes, or until the ravioli float to the surface. Use a slotted spoon to remove them, and repeat with more ravioli until they’ve all been cooked.
![Pulling a finished raviolo out of the pot using a slotted spoon]()
In a large saute pan, melt vegan butter over medium-low heat. Add the fresh sage leaves and baby bella mushrooms, then increase the heat to medium. Cook for about 10 minutes, stirring regularly, until the mushrooms have turned a golden brown color. Reduce the heat to medium-low and add the lemon juice and vegetable broth. Simmer for 2 minutes.
![2 images of mushrooms, butter, and sage leaves in a pan, on the left before cooking, and on the right after cooking]() Left: mushrooms and sage butter, just added to the pan; Right: mushrooms and sage butter cooked and ready for vegetable broth and lemon juice
Left: mushrooms and sage butter, just added to the pan; Right: mushrooms and sage butter cooked and ready for vegetable broth and lemon juiceAdd the ravioli to the sage butter sauce and stir until the ravioli are coated. You may need to add the ravioli in 2 batches, as they may not all fit in the pan. Garnish with sliced almonds or fresh sage leaves, if desired, and serve immediately.
![Ravioli in the pan with mushrooms and sage butter sauce]()


Notes & Hints
Making ravioli is a little more complicated than other recipes; for that reason I've put lots of tips in the post above. Please read through it if you've never made ravioli before!
Nutrition Data
Serving Size: 1/4 of recipe; Calories: 498; Fat: 31 g.; Saturated Fat: 17 g.; Cholesterol: 0 mg.; Sodium: 467 mg.; Carbohydrates: 46 g.; Fiber: 5 g.; Sugar: 4 g.; Protein: 11 g.; Vitamin A: 258 mcg. RAE; Vitamin B12: 4 mcg.; Vitamin C: 11 mg.; Vitamin D: 0 mcg.; Calcium: 68 mg.; Iron: 1 mg.; Potassium: 622 mg.; Zinc: 1 mg.Note: This data should be used only as an estimate. Please see the nutrition section of my terms and conditions for more information on how this data is calculated.


Vegan recipes in your inbox
Join the community and get my newest and best yummy vegan recipes sent right to your email!

Share this:


Leave a Comment
I love reading comments! I'll do my best to answer questions, too. If you made the recipe, please leave a star rating, it helps support the blog so I can make more recipes and articles. Thank you!
says